Msetter
Msetter is a free app for setting up a Leica M. Choose what each button does, put your Favorites and screen layouts in order, type your copyright and file names on a real keyboard, and design your user profiles side by side. It saves a settings file for each of your cameras. Everything stays in your browser. Msetter makes no network requests, so nothing you open or make leaves your computer. Works on the M11, M11-P, M11 Monochrom and M-EV1.
Try the app or get the Mac app, which also saves straight to a camera card.

Why
Typing on a camera is painful. Copyright, file names and profile names are spelled out one letter at a time with the direction pad.
Menus are deep and small. Every setting sits a few levels down a menu built for a three-inch screen. A new camera takes hours to set up.
You keep starting from scratch. After a reset, a repair or a firmware update, on a new body, and on a camera you borrow or rent, your setup is gone unless you remember it. Lend yours out and it may come back changed.
The Leica FOTOS app doesn’t fix it. It changes some settings from your phone, one at a time, with little way to organize your buttons, Favorites or user profiles.
Two cameras drift apart. An M11-P and an M-EV1 have slightly different menus. Keeping them alike means going through every menu on both.
Profiles multiply the work. A change you want everywhere has to be made in every user profile, one at a time.
Customize buttons
Choose what the top button, FN, the thumbwheel and the M-EV1’s front lever do. In Msetter, choose each job from a list. The Menu and center buttons keep their jobs.

What pros do
- Focus Aid on the top button, next to the shutter release, to magnify with the camera at the eye.
- Pressing the thumbwheel sets the ISO, with the ISO dial on M.
- Turning the thumbwheel sets exposure compensation for those who let the camera choose the shutter speed or ISO. Those who set exposure on the dials have it do nothing, so a bump can’t change it.
- FN left on its default.
- The M-EV1 lever off, or on Focus Aid and peaking.
Suggested button sets in the app
Focus with the rangefinder and set exposure on the dials. The top button magnifies to check focus, pressing the thumbwheel sets the ISO, and turning it does nothing, so nothing changes by accident.
Shoot on A with Auto ISO and steer it. Turn the thumbwheel for brighter or darker, press it for the maximum ISO, press FN for the slowest shutter speed. The top button opens Drive Mode for the self-timer and bracketing.
Switch user profiles from FN and keep Focus Aid on the top button, where pros keep it. Pressing the thumbwheel opens exposure compensation; turning it does nothing.
Organize the Favorites menu
Favorites holds up to eleven menu items you choose, and five fit on one page. In Msetter, add items from a list and drag them by their number into the order you want. On the camera, items stay in the order you added them; Msetter writes the order you drag. Each user profile can have its own Favorites.


What pros do
- Short or empty. The status screen already has ISO, drive, white balance, file format and more.
- Choose things you need often that aren’t on the status screen: film style, JPG settings, self-timer, shutter type, perspective control.
- The most-changed item first, and five or fewer, so it fits one page.
Suggested Favorites sets in the app
Menu goes from the status screen straight to the main menu. For people who change everything from the status screen and the buttons.
Change the JPG look, the file type and the size without going into the main menu. For shooting DNG and JPG, often black and white to judge the light.
Set the self-timer, the silent shutter, straightening, noise reduction and brackets before a tripod shot.
Choose your screen layouts
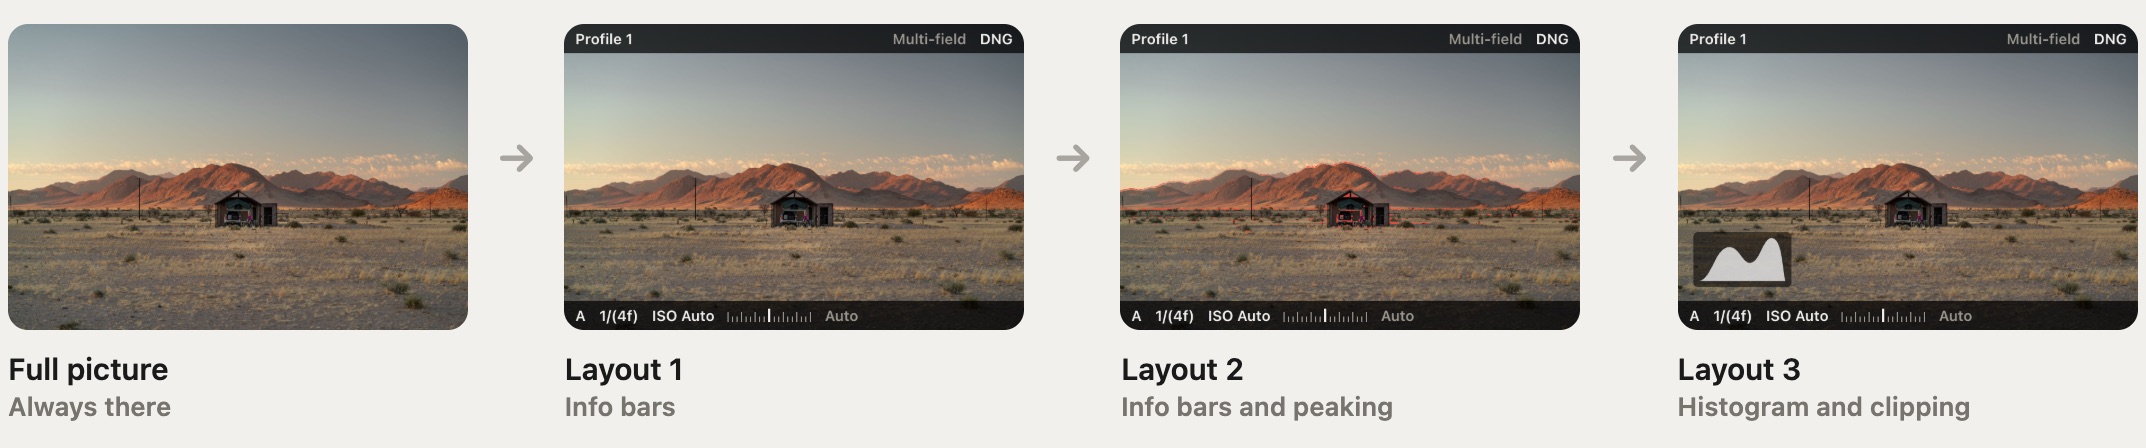
While you shoot, the center button steps from the full picture through each layout. Leica calls them info profiles. On the M11 bodies they show in Live View and the Visoflex, on the M-EV1 all the time. In Msetter, switch on what each of the four shows (info bars, grid, histogram, horizon, clipping, focus peaking) and drag them into order. An empty layout is skipped.
What pros do
- Info bars only for everyday shooting.
- Peaking on Low and red, or off and one press away.
- Histogram and clipping in a separate layout, for checking hard light.
- Magnifying from a button, rather than automatically when the focus ring turns.
- On the M-EV1, exposure preview on all the time.
Suggested screen layout sets in the app
The picture with only the exposure numbers; one press of the center button adds red peaking. For the rangefinder, opening Live View now and then.
A clear view to compose, a focus view with peaking, and an exposure view with histogram and clipping when the light is hard. For the M-EV1 or the Visoflex.
Level the camera with the grid and horizon, check exposure with histogram and clipping and nothing over the edges, then focus with peaking.
Change system settings
Change the deep settings without digging through the camera’s menus: film styles, file names, copyright, power saving and everything else. Each has a plain name and one line on what it does, and you type your copyright and file names on a keyboard instead of one letter at a time.

What pros do
- Picture review off, so the finder is free for the next frame.
- Touch off while shooting, so a nose can’t move the focus point. Off (LV mode) keeps touch for menus and pictures.
- Peaking sensitivity Low, for fewer marks that mean more.
Sensible defaults
- Peaking sensitivity Low
- Picture review off
- Touch off while shooting
- ISO on Auto at M on the ISO dial, and on the M-EV1
Every new file starts with these. Change any of them in the app.
Set up custom profiles for different subjects
A user profile is a way of shooting. Each one remembers many settings at once: how slow the shutter may go, how high the ISO may climb, the color and the JPG look, what the buttons do. Switch profile and they all change together, so going from bright sun into a dark room is one press, not ten settings. A profile can’t turn the dials or the lens, so with the shutter speed dial on A it sets limits: the slowest speed before the ISO rises, and the highest ISO. A limit lets the shutter go slow but doesn’t make it, so slow speeds in daylight need an ND filter (dark glass on the lens). In Msetter each profile is a column, so you see what changes from one to the next. The camera holds up to six, switched from the status screen, the menu or a button.

What pros do
- One for each kind of work or subject, such as landscape and portrait.
- Few, often just one, holding file formats and a few shortcuts.
- One kept as a copy of the whole setup, to put it back after a firmware update.
- A black and white profile, so the screen and viewfinder show the picture in black and white.
- Each with its own Favorites and its own lens choice, handy for a lens without a code.
- Switched from the status screen.
Suggested profile sets in the app
Everyday, Day and night, Street, Cinema, One speed and Speed ladder. Switch profile as the light changes.
Motion, Portrait, Landscape, Night, Events, Travel, and Kids and pets. One profile for each situation in it.
Color looks and Black and white. A JPG look in each profile; every picture also saves a DNG.
Factory: the camera as it comes, with one profile and sensible defaults.
Useful profiles
Sharp handheld, fast phone link
Silent shutter, no review, status light off
Vivid color, +1/3 EV, 3 s review
ISO up to 25000, −1/3 EV
Phone off, dim screens, off after 1 min
How to use it
- Pick your cameras. Choose the cameras you own; they can share one set of settings. If a camera lacks a setting, Msetter uses the closest one it has and tells you.
- Begin with your own settings or a suggestion. To use your own, export them from the camera to the card (User Profile › Manage Profiles › Export Profiles) and open that file in Msetter. Or pick one of the suggested sets.
- Change what you like. Every setting is on one page with a plain name and a line on what it does, so nothing is buried in menus. Your profiles sit side by side, so one change can go to all of them at once. The drawing shows what the camera will do, and Undo takes back anything.
- Save and import. Msetter makes a separate file for each camera. Copy
settings.lcseto the top level of the card, then choose User Profile › Manage Profiles › Import Profiles. With several cameras, Save all downloads one zip with a folder for each camera; put each file on its own camera’s card. Export your own settings first if you want a way back.
The camera doesn’t say when it skips a value, so check a few settings after your first import.